Dive Plan - The Crater at Homestead Resort — Midway, Utah
01 — DIVE PLAN OVERVIEW
Site | Date of Plan | Divemaster (Candidate) | Instructor |
The Crater at Homestead Resort Midway, Utah | April 2026 | Chris Roper | Jamie Peterson / Neptune Divers |
Group Size | Suggested Cert Level | Dive Type | Altitude |
5 divers + DM | SSI Open Water Diver or higher | Shore / Deck entry — geothermal cavern — altitude | ~5,900 ft — altitude protocols mandatory |
Site Selection Rationale
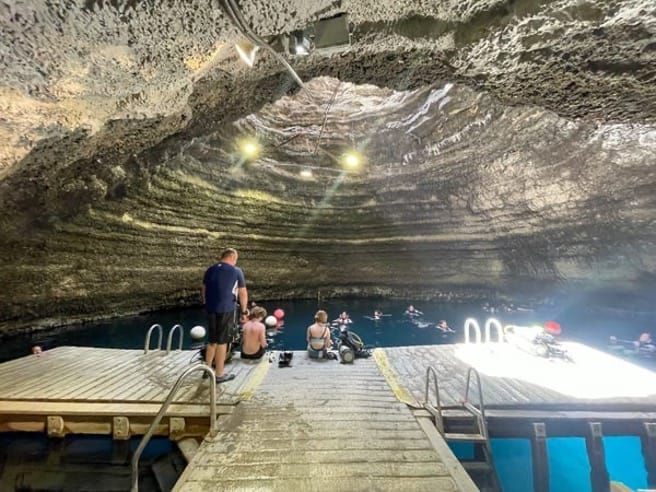
The Crater at Homestead Resort is selected as the dive site for this plan. It is a rare geothermal warm-water dive site — a 10,000-year-old geothermal limestone dome enclosing a circular pool approximately 60 ft in diameter and 65 ft deep, fed by a geothermal aquifer at 90–95°F year-round. Entry is via a 110-ft tunnel on the north face of the dome, leading to a wooden deck platform with designated scuba entry/exit areas. GPS coordinates: 40°31'26" N / 111°29'06" W at approximately 5,900–6,000 ft elevation. The site is appropriate for an Open Water certified group with proper altitude and overhead-environment briefing.
⚠ CRITICAL |
|
02 — SITE INFORMATION & ENVIRONMENTAL CONDITIONS
Site Overview
Parameter | Detail |
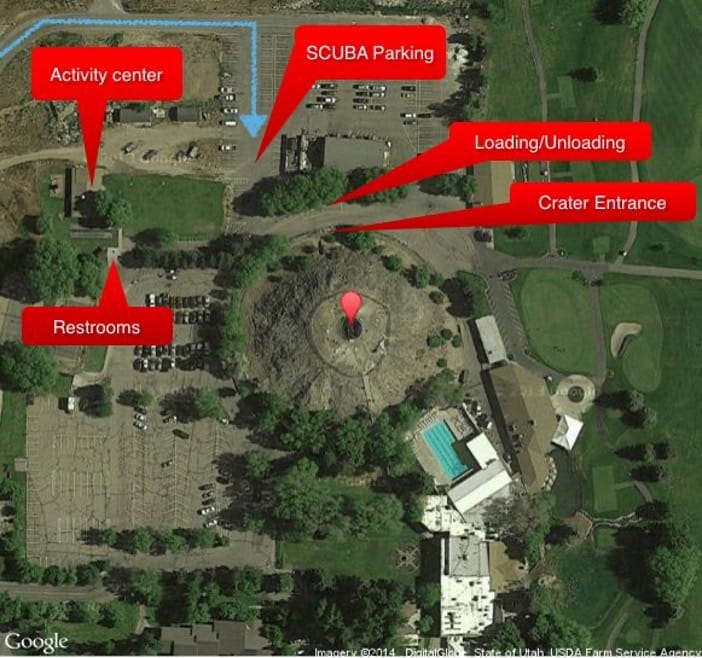
Location | 700 N Homestead Drive, Midway, Utah 84049 — Homestead Resort property |
Coordinates | 40°31'26" N / 111°29'06" W (40.52389, -111.48500) |
Elevation | ~5,900–6,000 ft ASL — altitude dive protocols required |
Site Type | Indoor geothermal limestone cavern / controlled commercial dive facility |
Water Temp (year-round) | 90–95°F — no wetsuit required; thin skin suit optional |
Visibility | 20–40 ft (degrades when silt is disturbed; worse on busy weekends) |
Site Max Depth | ~65 ft (physical) — OPERATOR LIMIT IS TYPICALLY 40 FT — confirm at check-in |
Our Planned Max Depth | 40 ft gauge — ~48 ft theoretical ocean depth at altitude |
Bottom Composition | Travertine limestone walls; archaeological silt 8–14 ft deep on bottom — do not disturb |
Current | None — fully enclosed still water |
Entry Type | Deck platform accessed via 110-ft tunnel — indoor walk-in |
Overhead Environment | YES — enclosed dome limits direct open ascent |
Facilities | Restrooms, changing area, soaking zones, activity center, diving operations office |
Access / Reservations | Commercial facility — advance reservation required; entry fee applies; sign waiver at activity center |
Shared Water | Swimmers and soakers may be present — maintain awareness of non-divers above |
Year-Round Conditions — The Crater at Homestead
Unlike most Utah dive sites, The Crater maintains near-constant conditions due to its enclosed geothermal environment. This plan is designed to be used year-round. The key variable is surface crowding — weekends and summer bring more swimmers and snorkelers, which increases silt disturbance and reduces visibility.
Parameter | Typical Value | Notes |
Water Temperature | 90–95°F year-round | Geothermal feed maintains constant temperature regardless of season |
Visibility (typical) | 20–40 ft | Best mid-week, early morning, or low-traffic periods |
Visibility (disturbed silt) | < 5 ft | Can take 1+ week to clear after bottom is disturbed |
Current | None | Fully enclosed still-water environment |
Thermocline | None | Isothermal throughout water column |
Ambient Light | Moderate / dim | Skylight at apex + installed wall lights; darker at depth — carry light |
Seasonal Impact on Dive | Minimal | Outdoor approach and parking may be affected by snow (Nov–Apr) |
Crowding — Peak | Jun–Aug / Weekends | Maximum swimmer/soaker activity; reserve early; expect lower vis |
Crowding — Ideal | Weekdays / Off-peak | Best conditions for DM-led groups; less silt disturbance |
★ Weekday mornings are the recommended time for this dive site. Best combination of visibility, low swimmer traffic, and silt conditions. Update environmental conditions in the Day-Of Conditions Log (Section 10) to reflect actual site state at time of dive.
Identified Site Hazards
- Overhead environment: enclosed dome limits direct open-sky ascent — divers must ascend within the open water column inside the dome
- Silt disturbance: 8–14 ft deep silt layer can reduce visibility to near zero instantly — strict buoyancy control and horizontal trim required near the bottom
- Shared water: swimmers, snorkelers, and soakers may enter the water column from soaking platforms — maintain upward awareness at all times
- Dim interior: even with installed lighting, visibility drops significantly at depth — primary dive light required; backup recommended
- Altitude dive risk: elevation ~6,000 ft shortens no-decompression limits significantly — see Section 04
- Heat stress: 90–95°F water temperature may cause heat stress during extended surface intervals or while suiting up in the tunnel — stay hydrated; allow cooling time between dives
- Tunnel access: 110-ft entrance tunnel has low clearance — carry tanks carefully; do not mount tank until on the deck platform
- Archaeological silt: the bottom contains thousands of historical artifacts from ongoing research — do NOT touch, dig, or disturb the silt floor under any circumstances
03 — SITE HISTORY, FEATURES & MARINE LIFE
Crater History
- The Homestead Caldera began forming approximately 10,000 years ago when snowmelt from the Wasatch Mountains percolated along fault lines and fractures to depths of 1–2 miles, where geothermal heat from Earth's interior warmed the water. As it rose back to the surface, mineral-rich water — primarily calcium carbonate — deposited travertine layer by layer over millennia, eventually forming the massive beehive-shaped limestone dome visible today.
- The spring still flows at approximately 135,000 gallons per day and maintains water temperature at 90–95°F year-round. The dome stands approximately 55 ft tall and is 400 ft wide at its base.
- In 1864, Swiss pioneer Simon Schneitter discovered the hot spring while farming the land. By 1886, Schneitter's Hot Pot Resort opened, beginning the resort legacy that continues today as Homestead Resort.
- Originally, access to the water required rappelling down through the natural skylight opening at the apex of the dome. In the 1990s, a 110-ft horizontal tunnel was blasted through the north face of the formation to allow general public access. The Crater opened commercially on July 12, 1996.
- The site was used as a filming location in Danny Boyle's 2010 film '127 Hours' and appeared in Season 16 of ABC's 'The Bachelor.' It remains one of the most distinctive geothermal dive sites in the United States.
- An ongoing archaeological research project works to recover historical items from the 8–14 ft silt layer on the bottom — including firearms, coins, and other artifacts accumulated over hundreds of years. The silt is off-limits for disturbance.
Underwater Features
Feature | Description & Notes |
Water column | Open circular pool approximately 60 ft in diameter; travertine limestone walls encircle the entire space |
Wall texture | Travertine formations with ledges, pockets, and mineral deposit patterns — close inspection recommended |
Silt floor | Archaeological silt 8–14 ft deep at the bottom of the crater — STRICTLY off-limits for touching or disturbance |
Installed lighting | Underwater lights mounted on walls; can be switched off for 'night dive' simulation on request |
Soaking zones | Two shallow-water designated soaking platforms at the surface on opposite sides of the dome |
Skylight | Natural opening at the apex of the dome allows sunlight to penetrate — mid-day provides best natural light |
Depth markers | Confirm with facility staff whether depth markings are currently posted on the walls |
Underwater Props & Points of Interest
The Crater is a geothermal freshwater system with no natural aquatic life due to high mineral content and water temperature. The facility has placed several artificial props for diver interest:
Prop / Feature | Location / Notes |
Plastic turtle sculpture | Installed at depth — site landmark |
Alligator prop (missing upper lip) | Well-known site landmark; useful depth reference |
Fern gully feature | Installed decorative feature |
Artificial snake prop | Installed prop — may surprise first-time visitors |
Wagon wheel | Resting on or near the silt — do not disturb |
Do NOT touch, move, or disturb any props or the surrounding silt. No aquatic organisms are expected.
Briefing Talking Points — Site Orientation
- The dome has one point of entry and exit: the deck platform via the 110-ft tunnel — there is no alternate exit
- Divers orient using the walls and installed lights — the small enclosed environment simplifies navigation but increases the importance of maintaining controlled buoyancy
- Always maintain awareness of other water users (swimmers/soakers) above you — look up before ascending
- Maximum depth is approximately 65 ft — confirm current operator limit at check-in; this plan is written for 40 ft
- The silt bottom is strictly off-limits for touching — approach must remain horizontal with minimum 5–6 ft clearance from the floor
- The overhead dome means you cannot perform an emergency free ascent — this must be explained clearly during the briefing
04 — DIVE PROFILE & NAVIGATION PLAN
Planned Dive Profile
Site Max Depth | Our Max Depth | Max Time | Safety Stop |
~65 ft (physical) OPERATOR LIMIT: 40 ft CONFIRM AT CHECK-IN | 40 ft gauge (~48 ft TOD at altitude) CONFIRM WITH STAFF | 15 min total dive time | 15 ft / 3–5 min — MANDATORY |
Altitude Depth Conversion Table
At ~6,000 ft elevation, actual gauge depths must be converted to Theoretical Ocean Depth (TOD) for table-based NDL planning. Dive computers in altitude mode handle this automatically — this table is for awareness and planning reference:
Gauge Depth (ft) | TOD (≈ 6,000 ft) | Approx NDL — Air (altitude) | Use Tables As |
15 ft | ~18 ft | Unlimited | 20 ft |
20 ft | ~24 ft | Unlimited | 25 ft |
30 ft | ~36 ft | ~100 min | 40 ft |
40 ft (operator standard limit) | ~48 ft | ~55 min | 50 ft |
40 ft ← THIS PLAN | ~48 ft | ~35 min | 60 ft |
65 ft (physical max — no-go) | ~78 ft | ~20 min | 80 ft |
Altitude Dive Protocols — Mandatory at This Site
⚠ CRITICAL |
|
Navigation Plan
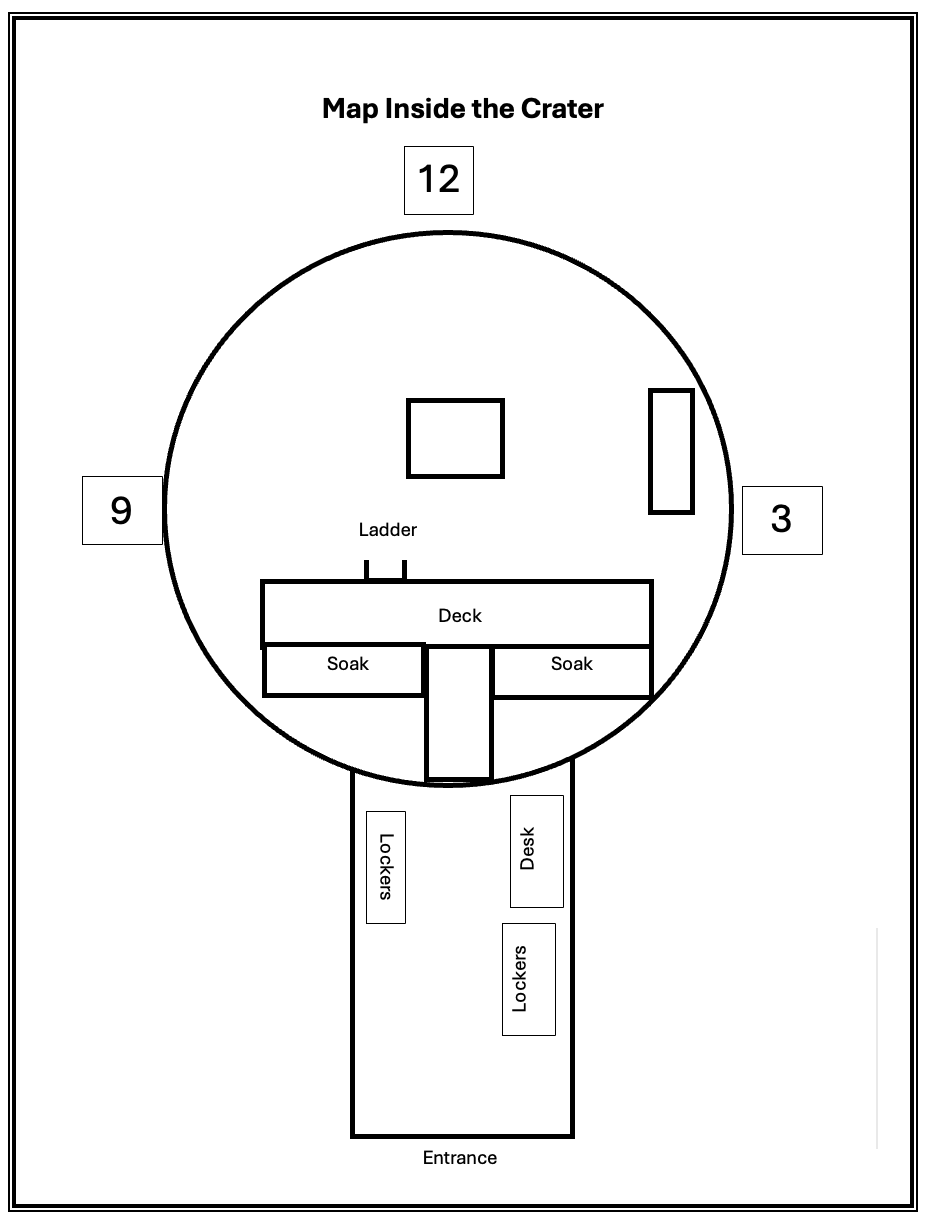
The Crater is a small, fully enclosed circular environment approximately 60 ft in diameter. This is a structured skills dive with a defined route using clock positions as reference points. The entry shallow area, the deck platform, and the buoyancy diamond skill station are the three fixed reference points for this dive.
Phase | Action |
Phase 1 — Staging | Gear up outside the tunnel. Do NOT mount tank in the tunnel. Carry all equipment to the deck before donning. Verify all computers in altitude mode. Confirm turn pressure with each diver. |
Phase 2 — Entry | Enter the shallow area on the right side of the deck entry. In the water, in the shallows, complete the full RAWFISH buddy check as a group before any descent. DM confirms all pairs. Signal OK on the surface. DM confirms all divers ready before moving off. |
Phase 3 — Descent | From the shallow entry area (6 o’clock), swim counterclockwise along the surface wall to the 3 o’clock position. Group stays together at the surface. DM confirms all divers ready and equalized before descent. |
Phase 4 — Exploration | At 3 o'clock, descend together to 40 ft along the wall. DM leads. Swim counterclockwise along the wall at 40 ft to the 6 o'clock position. Group pauses and holds position. DM confirms all divers stable and neutrally buoyant before proceeding to the skill station. |
Phase 5 — Turn | At the 6 o'clock position, divers complete the swim buoyancy diamond one at a time. DM signals each diver in turn. Remaining divers hold position neutrally buoyant at 40 ft until their turn. The buoyancy diamond tests controlled ascent, horizontal travel, descent, and return — precision buoyancy throughout. No silt contact. Once all divers have completed the diamond, DM signals ascent. |
Phase 6 — Ascent | Controlled ascent at maximum 30 ft/min. At 15 ft — full stop, 3 min mandatory safety stop. All divers hold position together before surfacing. |
Phase 7 — Exit | Surface together. Inflate BCDs. Look up before surfacing — confirm no swimmers above. DM confirms all divers before exit. Swim to the ladder on the dock. Remove fins at the water surface and place them on the deck before climbing out. Exit via the ladder. Pass remaining equipment to buddy. Single file through tunnel. |
05 — GAS MANAGEMENT PLAN
Rule of Thirds — Gas Policy
Starting PSI | Turn Pressure | Minimum Surface | Emergency Reserve |
3,000 PSI (full) | 2,000 PSI | 1,000 PSI | 500 PSI — abort dive |
2,800 PSI | ~1,870 PSI | ~935 PSI | 500 PSI — abort dive |
2,500 PSI (minimum start) | ~1,670 PSI | ~835 PSI | 500 PSI — abort dive |
The warm water (90–95°F) at this site is comfortable and reduces thermal stress on gas consumption — expect SAC rates similar to or slightly better than warm-water tropical dives. However, altitude physiology may slightly elevate breathing rate. Use 0.5–0.6 cu ft/min as a conservative baseline SAC for planning. At 30 ft for 15 min, gas consumption will be well within the Rule of Thirds for any diver starting at 2,500 PSI or above. DM will conduct gas checks at descent, at the 6 o'clock skill station, and at the safety stop. Any diver reaching 1,500 PSI signals DM immediately — group ascends together.
Hand Signals — Review Required Pre-Dive
Signal | Meaning |
Cutting or chopping throat with flat hand | Out of air — emergency |
Flat hand, palm down, moved slowly up and down | Take it easy / slow down — approaching reserve |
Circle made with thumb and forefinger, remaining fingers extended | Gas sufficient — all good |
Fist with thumb extended upward, hand moved upward | Ascend now — no discussion |
Thumb down, hand moved downward | Descend |
Open palm facing outward (stop sign) | Stop / hold position |
3 tank bangs | Emergency recall — ascend immediately |
Fist on top of head (above water) | I am OK — surface signal |
Open hand rocking side to side | Not OK / problem — needs attention |
06 — RAWFISH BUDDY CHECK (NEPTUNE DIVERS STANDARD)
All buddy teams complete RAWFISH before entry. DM verifies each team.
No one enters the water until all checks are confirmed.
| Component | What to Check |
R | Regulator Check | Confirm air is flowing from the regulator. Check that the mouthpiece is secure and not cracked or loose. Both divers breathe from their primary regulator to confirm function. Purge button tested. |
A | Air | Confirm air is turned on — valve fully open. Share starting PSI with buddy verbally — e.g. "I have 3,000 PSI." Buddy confirms their PSI in return. Both divers confirm minimum 2,500 PSI for this dive. Log starting pressures on slate. |
W | Weights | Confirm weights are secure and will not shift during the dive. Share with buddy how much weight you have and exactly where it is — e.g. "I have 6 lbs., integrated pockets, right and left." Buddy confirms they can locate and release your weights in an emergency. Demonstrate quick-release. |
F | Fins | Diver confirms fins are on, straps are secure. Vocalize to buddy — e.g. "Fins on and secure." Buddy visually confirms. Check fin straps are not twisted, and heel straps are fully seated. |
I | Inflator | Diver tests BCD inflator — press fill button and confirm BCD inflates, press dump and confirm it deflates. Double-check that the low-pressure inflator hose is tight and fully seated. Buddy observes and confirms. |
S | Secure | Diver double-checks all BCD buckles and strap tightness. Check all gear attached to the BCD — SPG, alternate air source, dive light, SMB — confirming each is properly clipped, tucked, and streamlined. Buddy does a visual sweep of the entire rig. |
H | Hand Signals | Diver and buddy review and verify hand signals with each other — both demonstrate each signal to confirm mutual understanding before entering the water. At minimum: OK, ascend, descend, stop, low on gas, out of gas, problem, and recall signal. |
07 — EQUIPMENT REQUIREMENTS
Individual Diver Equipment | Group / DM Equipment |
|
|
Site-Specific Equipment Notes
- Dive lights are MANDATORY — this site is dimly lit at depth even with installed underwater lighting; night dive simulation mode (lights off) is available on request
- All computers must be verified in altitude mode on the surface before entry — no exception; dive is aborted for any diver whose computer is not properly configured
- No exposure suit is needed — the 90–95°F water is comfortable in boardshorts or a skin suit; however, the tunnel and outdoor surroundings may be significantly cooler, especially in winter
- Tanks and gear must be transported through a 110-ft low-clearance tunnel — do not mount tank on BCD until you reach the deck platform
- All divers must complete and submit the Homestead Crater liability waiver before entering — confirm with the activity center prior to dive time
08 — SAFETY & EMERGENCY ACTION PLAN
Emergency Equipment Locations
Item | Location / Detail |
O₂ Kit | Confirm staging location with Homestead Crater activity center staff at check-in — demand valve + NRB mask |
First Aid Kit | Staged at deck entry area — dive-specific EDC kit |
Garmin inReach Mini | On DM person in waterproof Garmin case — primary emergency comms device |
Mobile Phone | Fully charged — carried to facility; confirm cell coverage at site |
Emergency Contacts | DAN: +1-919-684-9111 | 911 | Homestead Crater Activity Center: (435) 657-3840 |
Nearest Hospital | Heber Valley Hospital — 454 E Medical Way, Heber City, UT 84032 — ~5 miles / ~10 min |
Hyperbaric Chamber (Primary) | Utah Valley Hospital Wound Care & Hyperbaric, Provo, UT — ~25 min by ground |
Hyperbaric Chamber (Secondary) | Intermountain Medical Center, Murray, UT — ~50 min by ground |
Responsible Party | Chris Roper (DM Candidate) directs all emergency procedures |
Emergency Communications Protocol
PROTOCOL | Step 1 — On surfacing with an emergency: DM activates Garmin inReach SOS immediately. This triggers the GEOS International Emergency Response Center and dispatches rescue — faster than a phone call at a site with variable cell coverage. Step 2 — DM manages diver safety at the deck and exit area while rescue response is activated. Step 3 — Call Homestead Crater activity center at (435) 657-3840 immediately — facility staff can assist with O₂, patient management, and directing EMS to the correct entry point. Step 4 — Call 911 to confirm location (700 N Homestead Drive, Midway UT 84049), confirm inReach SOS is active, and relay medical information to responders. Rationale: inReach SOS activates the emergency system the moment the DM surfaces — no delay waiting for cell signal. Facility staff notification is critical as EMS must navigate through the resort property and tunnel to reach the patient. |
Emergency Action Sequence
- STOP — Establish positive buoyancy on the diver. Inflate BCD. Remove weights if necessary.
- SIGNAL — Alert other divers. DM takes command. Assist diver to deck and out of water, protecting airway.
- ASSESS — Check responsiveness, breathing, pulse. Begin CPR if indicated. Position appropriately.
- O₂ — Administer 100% O₂ immediately for suspected DCS, near-drowning, or loss of consciousness.
- NOTIFY FACILITY — Alert Homestead Crater staff immediately — (435) 657-3840.
- SOS — DM activates Garmin inReach SOS immediately upon surfacing with emergency.
- CALL 911 — Provide location, number of patients, mechanism of injury, current patient status. See Section 8.4 — Air vs. Ground Transport Protocol.
- DAN — Call DAN at +1-919-684-9111 for DCS assessment and hyperbaric referral.
- DOCUMENT — Record dive profile, time of incident, symptoms, and all actions taken for handoff to EMS.
Section 8.4 — Air vs. Ground Transport Protocol
Key Reference Points:
Facility | Contact / Dispatch | Est. Response |
Life Flight (Utah Valley / SLC) | 911 or 1-800-321-1911 | ~15–20 min flight once airborne |
Heber Valley Hospital | 911 (ground EMS dispatch) | ~10 min by ground from Midway |
Utah Valley Hospital Hyperbaric (Provo) | DAN: +1-919-684-9111 | ~25 min by ground |
Intermountain Medical Center Hyperbaric (Murray) | DAN: +1-919-684-9111 | ~50 min by ground |
At this site, ground transport to Heber Valley Hospital (~10 min) is faster than Life Flight response in most scenarios. Ground transport is the default for this site. Request Life Flight only when the patient requires a Level I trauma center or hyperbaric chamber that ground cannot reach in time, or when the patient is too unstable for ground transport.
Request Life Flight — Cardiac & Respiratory (ground transport too slow for definitive care):
- Cardiac arrest — CPR in progress. Call 911, continue CPR. If ground EMS response is delayed beyond 5 min, request Life Flight. Do not stop CPR.
- Unconscious with pulse but not breathing — Call 911 immediately; provide rescue breathing. Ground to Heber Valley is faster than Life Flight for initial stabilization.
- Severe respiratory distress — coughing blood, frothy sputum, or unable to speak in full sentences. Ground to Heber Valley (~10 min) is fastest; request Life Flight only if patient deteriorates rapidly en route.
- Suspected arterial gas embolism (AGE) — sudden unconsciousness, seizure, or stroke-like symptoms within minutes of surfacing. Ground to Heber Valley (~10 min) for initial stabilization; request Life Flight for transport to Utah Valley hyperbaric (~25 min ground) only if patient is too unstable for ground. Call DAN immediately — they will advise on transport.
Request Life Flight — Neurological (ground transport too slow for Level I trauma):
- Unconscious or unresponsive after surfacing — ground to Heber Valley (~10 min) for initial stabilization; request Life Flight if Level I trauma or neurosurgical intervention is needed.
- Seizure — ground to Heber Valley (~10 min); request Life Flight if seizures are ongoing or patient does not recover.
- Paralysis or inability to move any limb — ground to Heber Valley; request Life Flight for transfer to Level I trauma if spinal injury suspected.
- Sudden vision loss or blindness — ground to Heber Valley for initial evaluation.
- Confusion or disorientation that does not clear within 5 minutes of surfacing and O₂ administration.
Request Life Flight — Severe DCS Type II (hyperbaric needed, ground too slow):
- Any neurological symptom combined with joint pain.
- Loss of bladder or bowel control.
- Weakness or paralysis in any limb.
- Inability to walk or stand unassisted.
Request Life Flight — Trauma (Level I trauma center required):
- Head trauma with loss of consciousness.
- Suspected spinal injury — do not move the patient. Request Life Flight for immobilization and transport to Level I trauma center.
- Open fracture or severe crush injury.
⚠️ DCS + HELICOPTER WARNING |
|
USE GROUND TRANSPORT — Drive to Heber Valley Hospital (~10 min)
- DCS Type I — joint pain only, no neurological symptoms, diver alert and oriented. Administer O₂, drive to Heber Valley Hospital, call DAN en route.
- Skin rash or mottling only — diver alert and oriented, no neurological involvement.
- Near-drowning recovered — diver who aspirated water but is now conscious, breathing, and improving.
- Lacerations requiring stitches — bleeding controlled, no vascular compromise.
- Suspected fracture — limb intact, no neurovascular compromise, diver stable.
- Ear or sinus barotrauma — pain or hearing loss, no neurological symptoms.
- Fatigue, mild dizziness, or malaise improving with O₂ — diver oriented and ambulatory.
UNCERTAIN — Call DAN First: +1-919-684-9111 (24/7)
Any post-dive symptom where you are unsure of severity — call DAN before choosing transport mode. DAN medics are available 24/7 and will advise on transport method, flight profile, and receiving facility.
Quick-Reference Decision Table:
Condition | Transport | Destination |
Cardiac arrest | GROUND → Heber Valley first | Heber Valley Hospital |
AGE / sudden neuro symptoms | GROUND → Heber Valley; Life Flight (low alt) if unstable | Utah Valley Hyperbaric |
DCS Type II (neuro / paralysis) | GROUND → Heber Valley; Life Flight (low alt) if unstable | Utah Valley Hyperbaric |
Unconscious / not breathing | GROUND → Heber Valley first | Heber Valley Hospital |
Seizure | GROUND → Heber Valley first | Heber Valley Hospital |
Spinal trauma suspected | LIFE FLIGHT | U of U / Level I Trauma |
DCS Type I — joint pain only, stable | GROUND | Heber Valley Hospital |
Near-drowning, recovered and stable | GROUND | Heber Valley Hospital |
Minor trauma / ear or sinus barotrauma | GROUND | Heber Valley Hospital |
Unclear DCS symptoms | CALL DAN FIRST | DAN advises +1-919-684-9111 |
Rule of thumb: At this site, ground transport to Heber Valley Hospital (~10 min) is faster than Life Flight for most emergencies. Default to ground. Request Life Flight only when the patient needs a Level I trauma center or hyperbaric chamber and is too unstable for the additional ground transport time. You can cancel an air response if the patient improves. You cannot undo a delay in getting a critical patient to definitive care.
Lost Buddy Procedure
Underwater — stop, look, 360° scan for 1 minute. Signal DM. If not located: controlled ascent as a group. Surface — inflate BCD, signal OK, hold position. DM accounts for all divers before any re-descent. No diver re-enters without DM clearance. In The Crater, the enclosed environment makes a lost buddy rare — if a diver cannot be located on a full 360° sweep, ascend immediately.
Diver Recall Procedure
Emergency recall: 3 rapid bangs on tank (underwater) or 3 horn blasts (surface). On this signal — stop dive, ascend at safe rate, complete safety stop if gas permits, surface, inflate BCD, swim to deck. Do not search for other divers — DM manages accountability.
Abort Criteria
- Any diver's computer is not confirmed in altitude mode before entry
- Operator has not authorized planned depth — dive to confirmed limit only
- Excessive silt in suspension — visibility below 5 ft at entry
- Any diver reports feeling unwell, overheated, or uncomfortable before or during the dive
- Any diver reaches 500 PSI emergency reserve
- Overhead environment blocked or inaccessible — tunnel closure or structural concern
- Any medical emergency or equipment failure that cannot be resolved on site
09 — BRIEFING STRUCTURE (SSI 17-CRITERIA MAP)
The pre-dive briefing addresses all 17 SSI Dive Briefing Evaluation criteria in this order:
|
# |
Criterion |
Key Points |
|
1 |
Dive Guide Intro |
Name, role, group
expectations — nobody dives alone; DM is responsible party |
|
2 |
Site Name & Description |
The Crater at Homestead
Resort — Midway, Utah — ~6,000 ft — geothermal dome 10,000 years old —
enclosed cavern — warm water — commercial facility |
|
3 ⚠ |
Environmental Conditions |
90–95°F water, 20–40 ft vis
(variable), altitude protocol mandatory, all computers to altitude mode —
overhead environment — site is 65 ft deep, we dive to [confirmed limit] max —
watch depth gauge |
|
4 |
Marine Life |
No live organisms —
installed props (turtle, alligator, wagon wheel, fern gully, snake) — silt
floor off-limits — do not touch props — archaeological sensitivity |
|
5 |
Entry & Exit |
Tunnel walk-in to deck
platform — gear up outside tunnel — giant stride or step entry — exit via
ladder to deck — same entry/exit point — look up before ascending |
|
6 |
Max Depth & Time |
[Confirmed operator limit —
confirm at check-in] / 15 min total dive time — site goes to 65 ft — watch
depth gauge — wall curvature affects depth perception |
|
7 ⚠ |
Gas Management |
Rule of thirds — turn at
[X] PSI — review all gas signals — check pressure every 5 min — any diver at
1,500 PSI signals DM — group ascends together |
|
8 |
Type of Dive |
Deck entry — RAWFISH in
shallows — altitude — overhead environment — no-deco — structured route (6→3→6
o'clock) — buoyancy diamond skill at 6 o'clock — mandatory 3 min safety stop
at 15 ft |
|
9 |
Special Considerations |
Altitude, overhead dome,
silt sensitivity, shared water with swimmers/soakers, warm water heat stress,
archaeological silt — no disturbance of bottom |
|
10 |
Group Control |
DM leads surface swim and
descent — one diver at a time through buoyancy diamond — remaining divers
hold neutral at 40 ft — no solo movement — look up before ascending — all
divers visible to DM at all times |
|
11 |
Hand Signals |
Full review + diver
demonstration before entry |
|
12 |
Buddy Teams |
Teams assigned — RAWFISH
checks — gas and cert compatibility confirmed — demonstrate weight release to
buddy |
|
13 |
Lost Buddy |
Stop-look-signal-360°
scan-1 min — surface protocol — hold at deck — DM accounts for all |
|
14 |
Safety & Risk |
Check on buddy's location
and gas level often — maintain horizontal trim — no contact with silt — look
up before ascending to avoid swimmers |
|
15 |
Recall Procedure |
3 tank bangs or 3 horn
blasts — ascend immediately — safety stop if gas permits — surface at deck |
|
16 ⚠ |
Emergency Procedures |
Surface → inReach SOS →
notify facility staff → exit to deck → 911 → DAN — Heber Valley Hospital (~10
min) — Utah Valley Hospital hyperbaric (~25 min ground) |
|
17 ⚠ |
Equipment Location |
O₂ confirmed with facility
staff at check-in, first aid kit at deck area, inReach on DM person — DM is
responsible party |
10 — DAY OF CONDITIONS LOG

REMINDER: Any diver reporting unusual fatigue, joint pain, numbness, dizziness, difficulty breathing, or visual/neurological symptoms after this dive should be evaluated for decompression illness. Administer 100% O₂ and contact DAN (+1-919-684-9111) immediately.